
How (and why) to Wax Your Skis
Why Wax your Skis?
Waxing your ski's correctly can make all the difference to your skiing experience and you will find that it is really not that hard. For classic style cross country skiing there are two types of wax you will use, kick wax and glide wax. Kick wax helps you to "grip" the snow for a good push off so as to be able to glide on your skis (which glide wax helps maximize). The right kick wax will propel you forward on flat surfaces and even inclines if they are not too steep. This makes skiing much more enjoyable and helps you pass all those other skiers trying to make it up hills with their no-wax skis. Regular XC skiers apply kick wax to their skis every time they go out to ski (glide wax is applied much less frequently). Additionally, if you are going long distances you will want to bring some kick wax along so you can reapply as needed. Without good kick wax you really don't get too far unless you like using your poles ..... alot.
As referred to above, classic cross country skis have two zones, the kick zone and the glide zone. As you may have guessed, kick waxing is applying wax to the kick zone. The kick zone starts directly under the heel of where your boot sits (never go farther back then your heel) and extends under your foot to about 8-10 inches in front of your binding (see diagram on left). Everything outside the kick zone are the glide zones (front and back of your ski). If you ever buy your owns skis, the store (such as Fast Trax in Edmonton) will measure your kick zone so you know exactly where it is. However, for our rental skis, a rough approximation is good enough. You can experiment with the size of your kick zone, for example if you are not getting good "grip" on the snow try extending your kick zone by adding an inch or two on to the front of your kick zone (remember do not go behind your heel). Alternatively, if your skis are always sticking too much then try a smaller kick zone.
Kick Waxing
Before you start applying kick wax, it is best if you start with clean skis. Old wax and debris need to be taken off to allow the new wax to adhere well to the ski. To clean your skis you need wax cleaner (a liquid in a spray bottle or can) and a cloth. Spray the wax cleaner on the kick zone. If the ski is quite dirty you will want to rub in the wax cleaner on your kick zone with your finger to help penetrate the old wax/debris. After that use a cloth to wipe the ski clean. Note on wax cleaner .... make sure the cleaner you use is made for cross country ski wax (is in a spray bottle in our wax room / has a citrus smell) and only use it on your kick zone (not the glide zones).
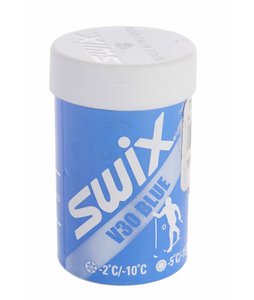
Next you put on the kick wax. Choosing the right wax is not that hard as for the average recreational skier you only need about 2-3 different kinds of waxes (ie purple, blue and green). Which one you use will depend on the temperature of the snow (which is most easily measured by looking at the outside temperature). Kick wax comes in cylinders such as you see below and are usually referred to by color. Below is "blue" wax. You will notice on the wax container it shows the temperature conditions -2 to -10 C. So if it's -9C outside, you will want to use this on your kick zone. If it's colder like -15 C, you might find this will be too sticky so you will want to use a harder kick wax like the color green which is made for colder temperatures. If it's warmer like -1 C you may want to use purple. When in doubt, check the wax label as some waxes are not colored the same way ... Also, feel free to experiment with different waxes as well. Some people love "all-purpose purple" and prefer to use this when it's -5 C rather then blue wax (I would suggest you try blue first though as you may find purple is too sticky for -5 C).
Waxing your ski's correctly can make all the difference to your skiing experience and you will find that it is really not that hard. For classic style cross country skiing there are two types of wax you will use, kick wax and glide wax. Kick wax helps you to "grip" the snow for a good push off so as to be able to glide on your skis (which glide wax helps maximize). The right kick wax will propel you forward on flat surfaces and even inclines if they are not too steep. This makes skiing much more enjoyable and helps you pass all those other skiers trying to make it up hills with their no-wax skis. Regular XC skiers apply kick wax to their skis every time they go out to ski (glide wax is applied much less frequently). Additionally, if you are going long distances you will want to bring some kick wax along so you can reapply as needed. Without good kick wax you really don't get too far unless you like using your poles ..... alot.
As referred to above, classic cross country skis have two zones, the kick zone and the glide zone. As you may have guessed, kick waxing is applying wax to the kick zone. The kick zone starts directly under the heel of where your boot sits (never go farther back then your heel) and extends under your foot to about 8-10 inches in front of your binding (see diagram on left). Everything outside the kick zone are the glide zones (front and back of your ski). If you ever buy your owns skis, the store (such as Fast Trax in Edmonton) will measure your kick zone so you know exactly where it is. However, for our rental skis, a rough approximation is good enough. You can experiment with the size of your kick zone, for example if you are not getting good "grip" on the snow try extending your kick zone by adding an inch or two on to the front of your kick zone (remember do not go behind your heel). Alternatively, if your skis are always sticking too much then try a smaller kick zone.
Kick Waxing
Before you start applying kick wax, it is best if you start with clean skis. Old wax and debris need to be taken off to allow the new wax to adhere well to the ski. To clean your skis you need wax cleaner (a liquid in a spray bottle or can) and a cloth. Spray the wax cleaner on the kick zone. If the ski is quite dirty you will want to rub in the wax cleaner on your kick zone with your finger to help penetrate the old wax/debris. After that use a cloth to wipe the ski clean. Note on wax cleaner .... make sure the cleaner you use is made for cross country ski wax (is in a spray bottle in our wax room / has a citrus smell) and only use it on your kick zone (not the glide zones).
Next you put on the kick wax. Choosing the right wax is not that hard as for the average recreational skier you only need about 2-3 different kinds of waxes (ie purple, blue and green). Which one you use will depend on the temperature of the snow (which is most easily measured by looking at the outside temperature). Kick wax comes in cylinders such as you see below and are usually referred to by color. Below is "blue" wax. You will notice on the wax container it shows the temperature conditions -2 to -10 C. So if it's -9C outside, you will want to use this on your kick zone. If it's colder like -15 C, you might find this will be too sticky so you will want to use a harder kick wax like the color green which is made for colder temperatures. If it's warmer like -1 C you may want to use purple. When in doubt, check the wax label as some waxes are not colored the same way ... Also, feel free to experiment with different waxes as well. Some people love "all-purpose purple" and prefer to use this when it's -5 C rather then blue wax (I would suggest you try blue first though as you may find purple is too sticky for -5 C).
After you picked the wax you want to put on your skis. Check out the video below to see how this is done. Notice the person puts a thin layer of wax then rubs it in with a cork. After he applies another layer he again rubs it in with the cork. For a long ski you may want to put 5 or more thin layers in this manner. Notice they use tape at either end of the kick zone ..... you really don't need to bother with this.....(unless you waxing for the race team perhaps).
Glide Wax
If you are willing to go one step further beyond kick waxing as illustrated above, this would be the next best thing to do. Glide wax is applied to those areas other the kick zone, which are either end of the ski and cover the majority of the ski. This is a hard wax which is melted on to the glide zones with an iron. After the ski cools, the wax is scraped off with a plastic scraper and polished with a brush. Since your using an iron and scrapping your ski you need to be very careful how you do this as you do not want to damage your skis. For this reason, the first time you do this you should do it with someone familiar with the process (keep an eye out for when our waxing instruction clinic is offered). You can check out the video below to get a sense of how this is done.
**Please note!!!! The video below shows how glide wax is applied to a "skate ski" which is used for skate skiing. A skate ski is different from a classic ski as it has no kick zone and therefore the whole ski is waxed the same way. On a classic ski (what most people use for cross country skiing) you wax the glide zones separately from the kick zone as you NEVER put glide wax on the kick zone and alternatively never put kick wax on the glide zone.